Author: Huang Publish Time: 27-04-2026 Origin: Site


Cutouts drift because different crews use different hole saws, patch work changes dimensions, and “close enough” measurements get accepted under time pressure. A few millimeters off can mean wobble, light leakage, cracked gypsum, or a site team improvising fixes you can’t control.
This guide is for consideration-stage buyers evaluating an adjustable cutout recessed LED panel light—specifically when you need to reduce returns, rework, and installation uncertainty across multiple rooms or sites.
Retrofit cutouts are a small detail that can snowball into time, cost, and finish-quality problems.
Mismatch cost isn’t the hole—it’s the rework: re-cutting, re-patching, schedule slip, and inconsistent visual results.
Measure the real opening, not the drawing: remove trim, measure the existing cutout, and share a consistent method with contractors (see Premier Lighting’s guide on how to measure the existing cutout size).
Expect variance across rooms and crews: in office/commercial and hotel/apartment retrofits, “standard” openings drift; an adjustable cutout recessed LED panel light adds a controlled fit range so small differences don’t become gaps, cracks, or on-site improvisation.
An adjustable-cutout design typically uses spring clips plus a sliding or multi-position mounting track so the same fixture can securely grip a range of hole diameters.
It helps when:
cutouts vary from room to room
you want to reduce SKU count for mixed sites
you need a safer “fit margin” to avoid returns
It does not remove the need to verify:
above-ceiling clearance
wiring conditions and junction access
compliance/documentation requirements for the project

Use this as a repeatable framework for RFQs and project submittals.
This is the first line item to verify. You want a clear minimum and maximum hole diameter, plus clarity on whether the adjustment is continuous (sliding) or fixed (multiple positions).
Pro Tip: Collect cutout measurements from the “worst” area (oldest ceiling section, most patched zone). Spec to that data—not the best room.
A fixture that fits the hole still needs space above the ceiling for the body and driver arrangement.
Also treat safety as part of procurement. Recessed luminaires can have clearance requirements around insulation or combustibles. InspectApedia summarizes common recessed-light clearance concepts in its recessed light clearance distances guide. (Always follow the exact product label and local code for the final installation method.)
Match lumens to the space and ceiling height. In retrofits, “same watts as before” is a frequent cause of under-lighting or over-lighting.
Beam angle is a proxy for how wide the light spreads. Wider beams generally support smoother ambient coverage (fewer hot spots) when spacing is reasonable.
If you want a plain-language refresher, HITLights explains the relationship between beam angle and coverage in its beam angle coverage explanation.
Set the baseline in your RFQ: CRI target, flicker expectations, and any glare limits the project calls for. If the supplier can’t document it, treat that as a risk.
You’re buying a thermal and mechanical system, not just LEDs. Look for clear statements about the heat path (materials, backplate, housing) and consistency across batches.
For Saudi projects, compliance requirements can vary by channel and application. Don’t assume—request the exact documentation package early (labels, test reports, and model-specific declarations).

Here’s what good spec clarity looks like.
KEOU’s frameless recessed panel light page lists cutout ranges by wattage for its product line. For example:
Power | Fixture size (Ø × thickness) | Cutout range (mm) | Luminous flux (lm) | Beam angle |
|---|---|---|---|---|
6W | Ø90 × 32 mm | 55–75 | 600 | 180° |
12W | Ø120 × 42 mm | 75–105 | 1200 | 180° |
24W | Ø170 × 42 mm | 75–155 | 2400 | 180° |
36W | Ø225 × 42 mm | 75–205 | 3600 | 180° |
Source: the specification table on the KEOU frameless recessed LED panel light.
The practical takeaway for buyers: you can match a site’s measured cutout spread to the correct size band instead of gambling on a single “nominal” diameter.
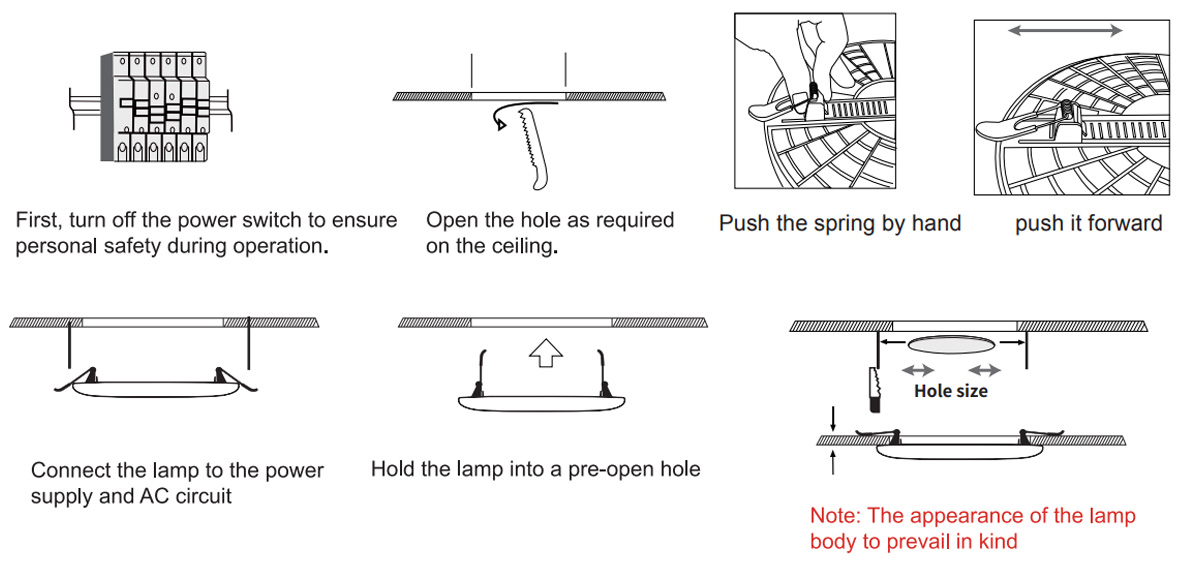
Spring-clip fixtures can speed up installs, but only if the site team keeps the basics consistent:
Ensure the cutout edge is clean and stable (loose gypsum reduces holding strength).
Compress clips evenly and verify the fixture seats flush.
Power off before wiring and use proper connections inside the junction area.
If you want a general internal reference for installers, KEOU also maintains an LED panel light installation guide that’s useful as a checklist.
To shortlist options quickly, collect three inputs up front:
Cutout diameter range on site (min and max)
Above-ceiling clearance constraints
Target lumen level per space type (corridor vs office vs retail)
If you share those three items, we can help map your project to the right size band, or propose alternatives from KEOU’s broader LED panel light categories.


