
Author: Site Editor Publish Time: 19-09-2026 Origin: Site


Table of Contents
Aperture size dictates how light interacts with a room. Incorrect fixture dimensions create visual discomfort, harsh glare, or inadequate illumination. You face a technical friction between aesthetic preferences for minimalist small apertures and structural realities like ceiling height, joist spacing, and lumen requirements. Balancing these factors ensures you do not compromise the lighting design. This guide provides a systematic framework for evaluating sizes, housing depths, and trim types. You will learn how to ensure code compliance and clean installation. We break down the exact measurements, spacing formulas, and electrical considerations required for a professional finish. Whether you are mapping out a kitchen remodel or dropping a new basement ceiling, selecting the proper fixture diameter prevents dark spots and overlapping shadows. You will walk away with actionable layout strategies that translate directly to the job site, allowing you to execute your lighting plan with precision.
Match Size to Function: Reserve 2-inch and 3-inch fixtures for accent lighting, utilize 4-inch for task-heavy areas (kitchens/bathrooms), and deploy 5-inch or 6-inch cans for general ambient lighting in standard rooms.
Evaluate Structural Constraints: Measure ceiling plenum depth before selection; utilize shallow housings or canless LED panel light fixtures when ductwork or joists restrict traditional can installation.
Verify Safety and Efficiency Codes: Mandate IC (Insulation Contact) and AT (Air-Tight) rated housings for insulated ceilings to prevent fire hazards and HVAC energy loss.
Calculate Spacing and Beam Spread: Base fixture placement on the ceiling height-to-spacing ratio (typically dividing ceiling height by two) to eliminate shadows and overlapping hot spots.
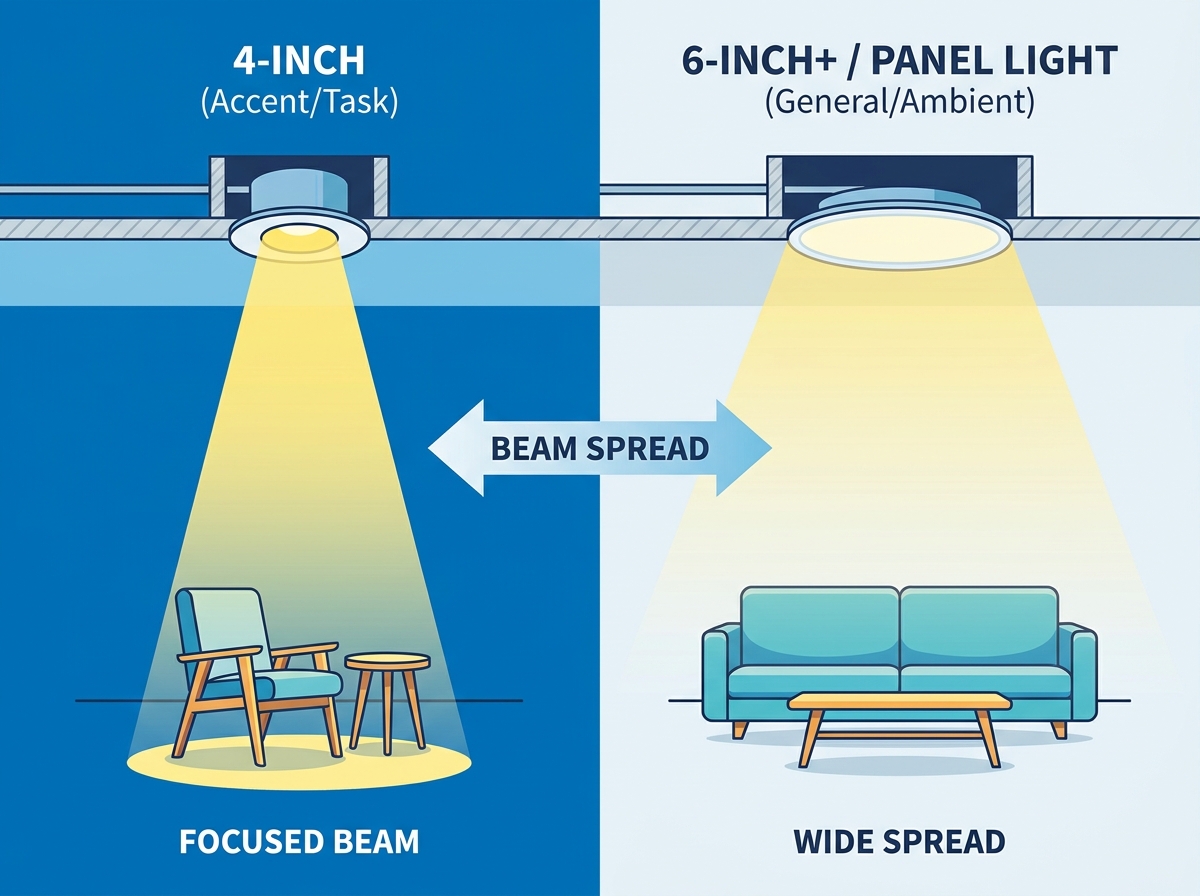
Fixture diameter directly controls beam geometry. A wider aperture allows light to spread further across the floor plane. Narrow apertures restrict the light cone. This creates concentrated pools of illumination. You must match the physical size of the fixture to the required lumen distribution. Small fixtures push intense, focused beams. Large fixtures deliver soft, wide ambient coverage. When you understand this relationship, you stop guessing and start designing with intent.
Ceiling height changes everything. An inverse relationship exists between ceiling height and perceived fixture size. A 10-foot ceiling demands more punch to reach the floor. High ceilings require larger apertures or narrower beam spreads. If you install tiny fixtures in a tall ceiling, the light dissipates before hitting the task surface. You lose functional illumination. The light scatters into the upper walls, leaving the lower half of the room feeling cavernous and dim.
Visual comfort relies on glare reduction. Deep-recessed housings hide the light source above the ceiling plane. You only see the light hitting the floor. You do not see the bulb itself. This drastically reduces eye strain. Shallow fixtures expose the light source. This creates harsh glare when you look across the room. Proper aperture selection mitigates this visual friction. We measure this discomfort using the Unified Glare Rating (UGR). A lower UGR means a more comfortable visual environment, which you achieve by keeping the light source recessed deep inside the housing.
Industry terminology often confuses buyers. A "4-inch can" refers to the nominal aperture. It does not refer to the hole you cut. The actual ceiling opening requires a larger diameter. You might need a 4-5/8 inch cutout for a nominal 4-inch fixture. This dictates your hole-saw selection. Always check the manufacturer template before drilling drywall. Cutting the hole too large ruins the ceiling. Cutting it too small binds the housing. You end up fighting the fixture during installation, which damages the drywall edges.
Small fixtures excel at highlighting architectural features. They wash textured walls beautifully. They illuminate artwork with precision. Designers love them for their minimalist footprint. They blend seamlessly into modern ceilings. You barely notice them when they are turned off. This makes them perfect for high-end residential projects where the ceiling needs to look clean and uncluttered.
They carry severe limitations. Small fixtures lack the lumen output for primary room illumination. You cannot light a large living room with 2-inch cans efficiently. They require precise placement. Poor positioning creates harsh, distracting shadows. Reserve these sizes for dedicated accent roles. If you try to use them for general lighting, you will end up installing dozens of them, which clutters the ceiling and drives up your labor costs.
The 4-inch fixture represents the current industry standard. It balances clean aesthetics with functional output. You will find these dominating modern kitchens. They provide excellent illumination for countertops. They work perfectly over bathroom vanities. They deliver localized task lighting exactly where you need it. When you space them correctly, they eliminate shadows over your cutting boards and sinks.
Trade-offs exist. You need a higher density of fixtures to light a large room. Replacing six 6-inch cans might require nine 4-inch cans. This increases your installation time. It also requires more wiring and junction boxes. You must weigh the aesthetic upgrade against the added labor. However, the cleaner look usually justifies the extra effort in primary living spaces.
Large fixtures deliver maximum light output. They utilize wide beam spreads. They easily illuminate sprawling living rooms. Basements benefit greatly from their broad coverage. Commercial spaces rely on them for uniform ambient lighting. You need fewer fixtures to achieve the required foot-candles. This speeds up the rough-in phase and reduces the total amount of wire you need to pull.
They present aesthetic challenges. Large cans appear visually intrusive in smaller rooms. They look dated in low-ceiling environments. A 6-inch fixture on an 8-foot ceiling dominates the visual space. Use them strategically in large areas where maximum lumen output outweighs minimalist design. They remain the go-to choice for garages, unfinished basements, and large retail floors.
Traditional setups utilize a modular approach. They require a separate metal housing. We call this the "can". You install this housing during the rough-in phase. It mounts directly to the ceiling joists using expandable metal hanger bars. You nail or screw these bars into the wood framing. Later, after the drywall goes up and the painters finish, you install a decorative trim and a bulb. This modularity allows for easy trim swaps in the future.
Traditional housings demand vertical space. You need a deep ceiling plenum. Ductwork often blocks installation. Plumbing pipes get in the way. If you hit an obstruction, you cannot install a standard can. You must relocate the fixture. This ruins your symmetrical layout. You end up with a ceiling grid that looks slightly off-center, which catches the eye immediately.
Modern construction often lacks adequate plenum space. Basement remodels frequently feature dropped ceilings packed with utilities. When vertical space disappears, traditional housings fail. You must pivot to alternative form factors. You cannot force a 7-inch tall metal can into a 3-inch gap between the drywall and a heating duct.
Canless fixtures solve these structural constraints. A modern Panel Light snaps directly into the drywall. It requires no bulky metal housing. The junction box sits separately on a short whip cable. You can slide these ultra-thin units directly under a ceiling joist. They bypass structural framing entirely. This guarantees your layout remains perfectly symmetrical. You just cut the hole exactly where you want the light, wire the remote junction box, and snap the flat panel into the ceiling using the spring-loaded clips.
Nominal Size | Typical Cutout Diameter | Primary Application | Ideal Ceiling Height | Typical Lumen Output |
|---|---|---|---|---|
2-Inch | 2-1/2" to 2-3/4" | Accent / Art Display | 8' to 9' | 400 - 600 |
3-Inch | 3-1/4" to 3-1/2" | Wall Wash / Soffits | 8' to 9' | 500 - 700 |
4-Inch | 4-1/4" to 4-5/8" | Kitchens / Task Areas | 8' to 10' | 700 - 900 |
5-Inch | 5-1/4" to 5-1/2" | Living Rooms / Bedrooms | 9' to 12' | 900 - 1100 |
6-Inch | 6-1/4" to 6-1/2" | Basements / Commercial | 10'+ | 1000 - 1500+ |
Safety codes govern how fixtures interact with insulation. IC stands for Insulation Contact. You can safely bury an IC-rated housing in fiberglass or blown-in cellulose. The fixture manages its own heat dissipation. It will not ignite surrounding materials. This rating remains non-negotiable for top-floor ceilings. Building inspectors check for this specific rating during the rough-in inspection.
Non-IC fixtures pose severe fire hazards. You must maintain a 3-inch clearance around the metal housing. If insulation touches a non-IC can, heat builds up rapidly. The internal thermal protector will trip. The light will cycle on and off constantly. Eventually, the fixture fails. Always verify the IC rating before covering a ceiling. If you blow cellulose insulation into an attic over non-IC cans, you create a massive fire risk.
Energy efficiency demands AT-rated fixtures. AT stands for Air-Tight. These housings prevent conditioned air from escaping into the attic. Standard housings act like chimneys. They suck warm air out of your living space. This drives up heating costs significantly. It also pulls dust and allergens down from the attic into your home.
Air leaks cause structural damage. When warm, moist air hits a cold attic, condensation forms. This moisture rots roof decking. It creates ice dams in winter climates. AT-rated housings feature factory-sealed seams. You install them with a foam gasket against the drywall. This stops air infiltration completely. Passing a blower door test requires AT-rated fixtures on all top-floor ceilings.
Proper spacing eliminates dark shadows. It prevents overlapping hot spots. The standard rule divides your ceiling height by two. An 8-foot ceiling requires 4 feet of space between fixtures. A 10-foot ceiling allows for 5 feet of spacing. This formula guarantees even ambient coverage across the floor plane. It provides a reliable baseline for any residential layout.
Start your layout from the walls. Divide your standard spacing by two. If your fixtures sit 4 feet apart, place the first row 2 feet from the wall. This prevents harsh scallops of light on the paint. It pushes the light cone evenly down the wall surface. If you place the fixtures too close to the wall, you highlight every drywall mudding imperfection.
Task areas require tighter grouping. Kitchen counters need intense illumination. Place 4-inch fixtures exactly 36 inches from the wall. This aligns the light directly over the countertop edge. If you place them further back, your body blocks the light. You will cast shadows on your cutting board. If you place them too close to the cabinets, the upper cabinets block the light cone.
Ambient areas tolerate wider spacing. Living rooms benefit from softer light. You can stretch the spacing slightly. Focus on illuminating pathways and seating areas. Avoid placing fixtures directly above television screens. This creates terrible glare on the glass. Map out your furniture layout before you drill any holes in the ceiling.
The trim dictates how light exits the fixture. Baffle trims feature deep grooves. These ridges absorb stray light. They drastically reduce glare. Baffles remain the most popular choice for residential living spaces. They create a quiet, comfortable ceiling. You can choose black baffles to absorb even more light, which hides the fixture entirely in dark ceilings.
Reflector trims maximize lumen output. They feature a smooth, polished interior. They push every available lumen downward. Use reflectors in high ceilings or commercial spaces. They sacrifice visual comfort for raw efficiency. They look highly technical and bright. You often see these in retail stores where pushing light to the floor displays matters more than ceiling aesthetics.
Sloped ceilings require directional control. Gimbal trims pivot inside the housing. You can aim the light straight down, regardless of the ceiling pitch. This prevents the light from shining directly into your eyes. Gimbals also work perfectly for highlighting fireplace mantels. You just tilt the eyeball mechanism toward the brickwork.
Wall wash trims feature a specialized scoop. This shield blocks light from entering the room. It forces all illumination sideways onto the wall. Use these to highlight textured stone or large artwork. They create a smooth, even gradient of light from ceiling to floor. They eliminate the scalloped effect that standard trims produce when placed near a wall.
Layout planning begins with a stud finder. You must map every ceiling joist before cutting. Mark the framing with painters tape. This visual grid prevents disastrous layout errors. You do not want to drill a hole and hit solid wood. Use a cross-line laser level to project a perfectly straight grid onto the ceiling. This ensures your rows line up flawlessly.
Check for hidden utilities. Plenums hide plumbing pipes, HVAC ducts, and electrical runs. Drill a small 1/4-inch pilot hole first. Insert a bent piece of wire. Spin it around the cavity. If the wire hits an obstruction, you must adjust your layout. Finding a pipe before you cut a 6-inch hole saves hours of drywall repair. It keeps your project moving forward without costly patching delays.
Precision cutting ensures a tight fit. Ditch the manual drywall saw. Use a dedicated hole saw attached to a drill. Match the saw diameter exactly to the manufacturer's template. A 4-5/8 inch saw cuts a perfect circle for a nominal 4-inch fixture. Carbide-grit hole saws work best for drywall because they do not tear the paper backing.
Protect the surrounding drywall paper. Run the drill in reverse for the first few seconds. This scores the paper cleanly. It prevents the teeth from tearing the surface. Once scored, switch to forward rotation. Apply light pressure. Let the saw do the work. Use a dust-bowl attachment to capture the falling gypsum. This keeps the job site clean and protects your eyes from falling debris.
Housing selection depends on your ceiling state. New construction housings install before the drywall goes up. They feature metal hanger bars. You nail these bars directly to the joists. The housing slides along the bars for perfect positioning. This provides the most secure installation possible. You wire these fixtures during the rough-in phase, leaving the wires safely tucked inside the metal box.
Remodel housings install after the drywall is finished. You push them up through the cut hole. They utilize metal spring clips. You push these clips outward. They bite into the top side of the drywall. The drywall itself supports the weight of the fixture. Ensure your drywall is at least 1/2-inch thick to support this load. If you have older 3/8-inch drywall, the clips might punch right through the material.
Every fixture requires a secure electrical connection. Quality Recessed Lighting fixtures include an attached junction box. You must route your Romex cable into this box. Secure the cable with an approved strain relief clamp. Never leave loose cables resting on sharp metal edges. The sharp edges will eventually slice through the plastic sheathing and cause a dead short.
Strip the wires carefully. Leave exactly 1/2-inch of exposed copper. Connect the ground wire first. Use modern push-in wire connectors instead of traditional twist nuts. They provide a more secure, vibration-proof connection. Tuck the wires neatly into the box. Snap the cover shut. Ensure no wires get pinched in the door. Push the entire assembly through the ceiling hole and let it rest on the drywall.
Color temperature alters how a room feels. We measure this in Kelvin (K). A 2700K bulb produces a warm, yellow light. It mimics traditional incandescent bulbs. Use this in bedrooms and living rooms. It promotes relaxation. It makes wood tones look rich and inviting. It creates a cozy atmosphere for evening downtime.
A 4000K bulb produces a cool, crisp white light. It mimics daylight. Use this in kitchens, bathrooms, and garages. It enhances contrast. It makes white cabinets look pristine. It improves visual acuity for detailed tasks. Mixing color temperatures in the same room looks terrible. Pick one Kelvin rating for an open-concept space and stick with it.
Lumen output only tells half the story. Color Rendering Index (CRI) measures light quality. It dictates how accurately colors appear under the light source. A low CRI makes colors look muddy and gray. A high CRI makes colors pop vibrantly. The R9 value specifically measures how well the light renders deep reds, which impacts skin tones and wood finishes.
Always demand fixtures with a CRI of 90 or higher. This ensures your expensive countertops, paint colors, and flooring look accurate. High CRI lighting transforms a dull room into a vibrant space. It represents a minor cost upgrade for a massive visual improvement. Do not spend thousands on custom cabinets only to wash them out with cheap, low-CRI lighting.
Modern fixtures require compatible controls. You cannot use an old incandescent dimmer switch with new LED fixtures. The technology clashes. The lights will flicker, buzz, or drop out completely. You must install an LED-rated dimmer switch. These switches handle the low wattage loads without disrupting the electrical sine wave.
Check the driver specifications. Some fixtures require ELV (Electronic Low Voltage) dimmers. Others work fine with standard TRIAC dimmers. Match the switch to the fixture's internal driver. This guarantees smooth, silent dimming down to 1%. If you hear a buzzing sound coming from the ceiling, you likely have a dimmer mismatch.
Large rooms require long electrical runs. Voltage drop becomes a factor. If you daisy-chain fifteen 6-inch fixtures on a single circuit, the last light might receive less voltage. This causes uneven dimming. The lights at the end of the line will dim faster than the lights at the switch. This looks highly unprofessional.
Limit the number of fixtures per switch leg. Keep your wire runs as short as possible. Use 14-gauge wire for standard 15-amp lighting circuits. If the run exceeds 100 feet, upgrade to 12-gauge wire. This minimizes voltage drop and ensures consistent performance across the entire ceiling. Calculate your total wattage load before wiring the switch to ensure you do not overload the dimmer rating.
Measure your ceiling plenum depth before purchasing any fixtures to determine if you need traditional cans or ultra-thin designs.
Map your ceiling joists with a stud finder and mark the layout with painters tape to avoid structural conflicts before cutting drywall.
Select 4-inch fixtures for kitchens and task areas, placing them exactly 36 inches from the wall to eliminate shadows over countertops.
Verify that all housings carry IC and AT ratings if you are installing them in an insulated top-floor ceiling to prevent fire hazards.
Install LED-compatible dimmer switches matched to the specific driver technology of your chosen fixtures to prevent flickering and buzzing.
A: No. Trims are engineered for specific housing diameters. A 6-inch trim will not fit securely into a 5-inch can. The torsion springs or friction clips will not align properly. Always match the trim size exactly to the nominal housing size for a safe, flush fit against the drywall.
A: Remove the bulb and pull down the decorative trim. Look inside the metal can. You should see a silver or white manufacturer sticker. This label will explicitly state "IC Rated" or "Non-IC". If the label is missing, assume it is Non-IC to prevent fire hazards in insulated ceilings.
A: A baffle trim features deep, concentric ridges designed to absorb stray light and reduce glare, making it ideal for living spaces. A reflector trim has a smooth, polished interior that maximizes lumen output by pushing all light downward, which works best for high ceilings or commercial areas.
A: Yes. You must use specialized sloped ceiling housings. These cans feature an angled interior that allows the light bulb to point straight down. Pair them with gimbal trims or dedicated sloped trims to ensure the light cone hits the floor evenly rather than glaring into the room.
A: Buzzing indicates a compatibility issue between the dimmer switch and the LED driver inside the fixture. Older incandescent dimmers chop the electrical sine wave in a way that stresses LED components. You must replace the switch with an ELV or LED-rated dimmer approved by the fixture manufacturer.
A: Yes. Canless fixtures require exact cutout dimensions. A nominal 4-inch canless light often requires a 4-1/4 inch or 4-3/8 inch hole. Check the provided paper template. Use an adjustable hole saw or buy the exact diameter required to ensure the spring clips hold the fixture tightly against the drywall.


