
Author: Huang Publish Time: 19-08-2026 Origin: Site


Selecting the right LED panel light involves more than choosing wattage, color temperature, or luminous efficacy. On commercial job sites, the physical structure of the ceiling dictates how the fixture can be safely and securely mounted. Installing an LED panel into a drop T-bar grid requires a completely different approach and hardware kit than mounting the same fixture onto a monolithic concrete slab or a hollow gypsum drywall ceiling.
Understanding the primary led panel light installation methods helps electrical contractors, project engineers, and lighting distributors prevent costly job-site delays, structural misfits, and unsightly ceiling gaps. This comprehensive guide breaks down the four core installation techniques—lay-in drop grid, recessed cut-in, surface-mounted frame, and suspended pendant cable—and pairs each method with its corresponding ceiling architecture.
Commercial buildings feature diverse ceiling constructions depending on acoustic requirements, plenum depth, architectural aesthetics, and building codes. Before ordering fixtures or mounting hardware, installers must evaluate four critical structural factors:
Plenum Depth & Overhead Space: Drop ceilings offer generous plenum space for drivers and wiring, whereas solid concrete slabs offer zero recessed depth, forcing drivers to reside inside a surface-mounted enclosure.
Structural Load Capacity: Hollow gypsum board cannot support heavy commercial troffers without specialized anchoring, while T-bar grids require secondary safety cables anchored directly to the structural slab above.
Accessibility for Maintenance: Suspended acoustic tiles allow effortless driver access, whereas sealed drywall ceilings require remote driver placement or specialized access hatches.
Visual & Aesthetic Integration: Commercial projects in regions like the UAE often demand sleek, low-glare visual finishes. Choosing between a completely flush recessed panel and an architectural surface frame shapes the overall interior aesthetic.
Ceiling Architecture | Common Application | Primary Mounting Method | Required Hardware & Accessories | Key Advantage |
|---|---|---|---|---|
Drop T-Bar Grid Ceiling | Commercial offices, hospitals, schools | Lay-In / Drop-In Mounting | Built-in T-grid hooks, aircraft safety cables | Fast, tool-free placement; instant driver plenum access |
Gypsum Drywall Ceiling | Retail stores, luxury residential, executive suites | Recessed Cut-In Mounting | Butterfly spring clips, or recessed aluminum mounting frames | Flush, seamless ceiling aesthetic; low profile |
Solid Concrete Ceiling | Hard slab structures, renovated basements | Surface Mounting | 4-piece aluminum surface frame kit, masonry wall plugs | No ceiling cutting needed; completely conceals driver |
Exposed Open Deck Ceiling | Open-plan offices, industrial halls, retail spaces | Suspended Pendant Cable Mounting | Stainless steel wire suspension kits, adjustable push-grippers | Flexible height positioning; industrial aesthetic; optimal cooling |
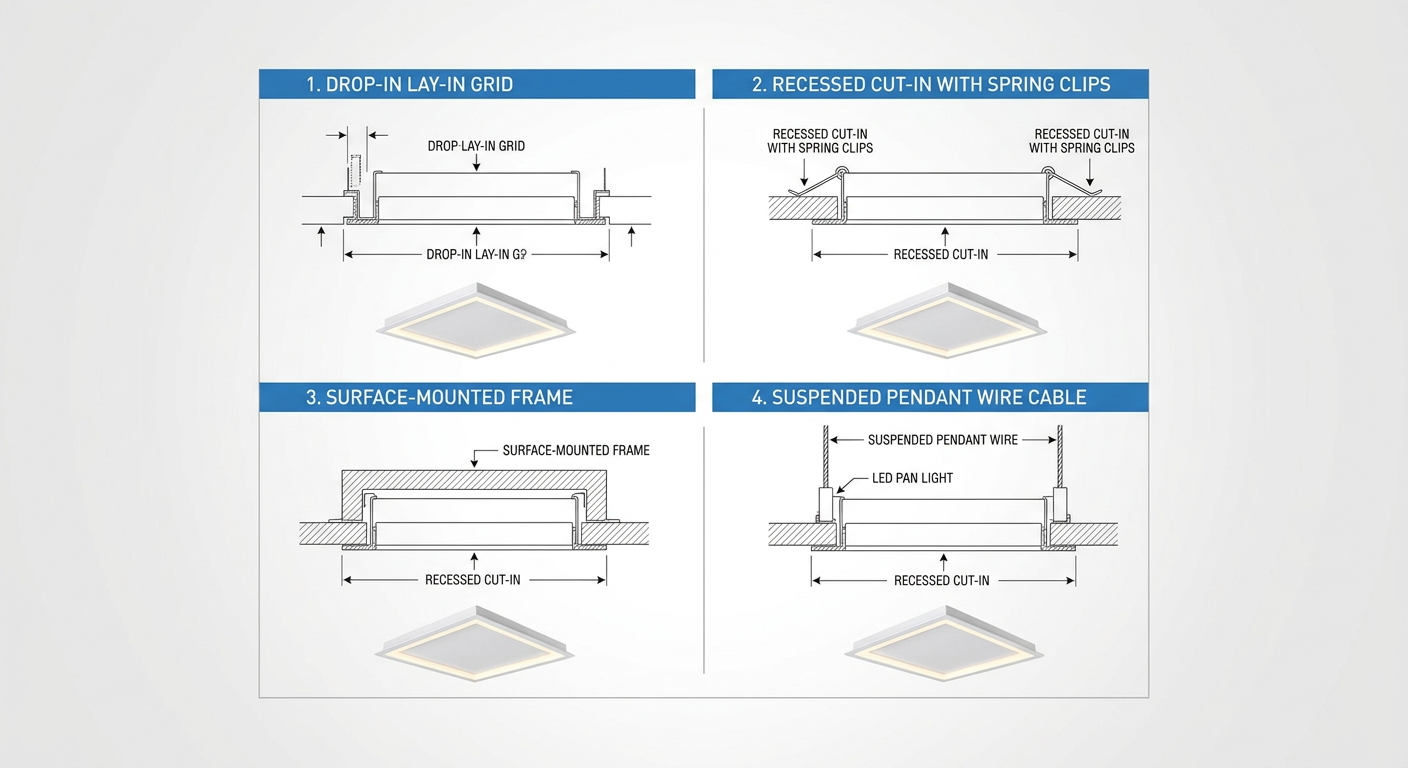
Drop ceilings—consisting of metal T-bar grids (15/16-inch or 9/16-inch) holding acoustic tiles—are the standard in commercial office environments. The lay-in installation method takes full advantage of this grid structure, replacing a standard ceiling tile with an LED panel fixture.
Key Takeaway: Drop-in lay-in mounting is the fastest installation method for grid ceilings, but electrical safety codes require independent safety wire attachments to the structural slab above.
Structural Deck / Concrete Slab
Safety Cable Safety Cable ======================================= T-Bar Grid Panel Light
Power Isolation & Verification: Shut off power at the main circuit breaker panel. Always verify zero voltage at the fixture wires using a non-contact voltage tester before touching plenum electrical lines.
Tile Removal & Area Preparation: Lift and remove the existing acoustic tile or legacy fluorescent troffer fixture at the designated lighting location.
Diagonal Panel Insertion: Unpack the LED panel light. Tilt the panel at a 45-degree diagonal angle to lift it through the grid opening into the upper plenum space.
Grid Seating: Carefully rotate the panel horizontally and lower it onto the T-bar grid flanges so that all four outer edges rest evenly on the grid lips.
Driver Electrical Wiring: Open the external LED driver junction box. Connect the incoming line voltage (Live, Neutral, and Earth Ground) using approved wire nut connectors or lever wire blocks, ensuring all knockout strain reliefs are locked in place.
Securing Safety Clips & Cables: Bend the pre-installed mounting clips on the back of the panel over the T-bar grid. Attach two independent stainless steel aircraft safety cables from the panel's corner mounting brackets directly to the overhead building structure.
In architectural spaces with continuous plasterboard or gypsum drywall false ceilings, recessed mounting creates a clean, flush appearance where the frame sits nearly flat against the ceiling surface.
When specifying fixtures for hollow ceilings, choosing high-efficiency recessed LED panel lights with spring clips ensures quick retention without damaging fragile gypsum edges.
Pro Tip: When cutting drywall for recessed panel lights, use a stud finder first to map out ceiling joists and metal furring channels. Never cut through primary structural ceiling supports.
Marking Cutout Dimensions: Use the manufacturer's cutout template to draw precise lines on the gypsum ceiling. For square or rectangular panels, measure carefully to ensure the opening is plumb and square.
Cutting the Gypsum Opening: Carefully cut along the marked line using a manual drywall jab saw or an oscillating multi-tool. Smooth any loose plaster edges around the perimeter.
Driver Placement: Pass the pre-wired LED driver box through the cutout and set it inside the ceiling void on top of a nearby drywall support channel, keeping it clear of thermal insulation.
Engaging Butterfly Spring Clips: Lift the panel toward the cutout. Fold the spring-loaded clips upward at a 90-degree vertical angle against the sides of the panel housing.
Flushing Panel into Ceiling: Guide the panel upward into the cutout. As the spring clips clear the drywall thickness, release them. The springs snap outward against the upper face of the drywall board, pulling the trim tightly against the ceiling face.
For larger commercial panels (such as 60×60 cm or 2×4 ft troffers) installed in drywall, installers often utilize a pre-assembled recessed drywall aluminum frame. The frame is screwed into the ceiling studs first, providing a rigid perimeter grid for the panel to slide into cleanly.
In monolithic concrete structures or spaces with low ceiling clearance where cutting or recessed voiding is impossible, surface mounting is the ideal solution. Installers assemble an external aluminum surface frame that attaches directly to the hard slab, creating a clean box that houses both the LED panel and its external power driver.
Using lightweight, high-output surface-mounted frameless LED panel lights reduces the overall frame profile while delivering wide 120-degree light distribution.
⚠️ Warning: Always ensure the surface mounting frame depth is deeper than the external driver box height. Inadequate frame depth will prevent the panel from sliding in completely, leaving a gap between the frame faceplate and panel edge.
Frame Pre-Assembly: Connect three sides of the 4-piece aluminum mounting frame kit using the provided corner assembly screws. Leave one end piece open.
Ceiling Marking & Drilling: Hold the 3-sided frame against the concrete ceiling. Mark the mounting screw hole locations with a pencil. Drill holes into the concrete slab using a masonry drill bit.
Securing Frame to Concrete: Insert nylon wall expansion plugs into the drilled holes. Screw the 3-sided aluminum frame securely against the concrete slab using heavy-duty wood/masonry screws.
Wiring & Driver Housing: Route mains power into the frame through the rear cable entry knockout. Connect the wiring to the LED driver box and rest the driver flat inside the rear cavity of the surface frame.
Panel Slide-In & Closing: Slide the LED panel light into the open slot of the 3-sided frame until it connects firmly with the driver output plug.
Attaching Final Faceplate: Position the 4th side frame piece over the open end and fasten it with corner screws to seal the fixture.
In modern commercial interiors, tech offices, and industrial retail spaces featuring open structural decks or exposed ductwork, suspended pendant mounting offers outstanding aesthetic and functional flexibility. Stainless steel wire suspension kits allow panels to hang gracefully from high ceilings at a uniform working height.
Setting Suspension Base Anchors: Mark four anchor points on the overhead concrete slab or structural steel deck corresponding to the panel's corner eyelets. Drill holes and secure the threaded base anchor caps into the ceiling.
Threading Aircraft Cables: Screw the upper cable ends into the ceiling base caps. Let the stainless steel aircraft cables hang vertically down toward the installation plane.
Attaching Panel Mounts: Screw the lower cable attachment hooks or bracket clips to the four rear corners of the panel fixture.
Height Adjustment & Leveling: Pass the wire cables through the spring-loaded push-gripper locks on the panel mounts. Press the gripper sleeve to slide the cable up or down until the panel achieves the desired hanging height and perfect horizontal spirit-level alignment.
Power Feed Cable Connection: Run a flexible, strain-relieved power supply cord from the ceiling junction box down alongside one of the suspension cables, securing it neatly with clear cable ties.
When specifying panel lights across commercial properties, evaluating electrical and mechanical factors ensures long-term reliability and compliance with local building codes.
LED panel drivers generate heat that must dissipate into the surrounding air. In warm climates, tight ceiling plenums without adequate airflow accelerate driver thermal degradation. Always ensure at least 30 mm to 50 mm of free air space around the driver box when installing recessed panels in insulated drywall or acoustic ceilings.
For educational institutions, open-plan offices, and screen-intensive workspaces, glare management is essential for visual comfort. Specifying frameless recessed square LED panels equipped with microprismatic or honeycomb optical diffusers maintains unified glare rating (UGR) levels below 19 without sacrificing lumen output.
In high-occupancy commercial facilities, relying solely on friction clips or ceiling grid flanges creates safety risks during building settling or seismic vibration. Always attach dedicated steel safety tethers from the fixture chassis directly to structural floor joists or concrete slabs.
Incorrect Cutout Tolerances: Cutting drywall openings too wide prevents spring clips from grabbing solid gypsum, causing the panel trim to sag over time. Always cut conservatively according to manufacturer specifications.
Pinching Driver Wiring: Forcing excess wire insulation into shallow surface-mount frames can pinch AC conductors against metal edges, leading to short circuits or breaker trips.
Ignoring Earth Grounding: Omitting the green/yellow CPC earth wire connection on metal panel housings creates an electrical shock hazard during driver maintenance.
Mixing Up Driver Output Voltages: Connecting a constant-current LED panel directly to line AC voltage without its designated external driver will permanently damage the LED chips.
Yes. Standard drop-in flat panels can easily be converted for surface mounting by purchasing an auxiliary aluminum surface mount frame kit matching the panel's dimensions (e.g., 60×60 cm or 30×120 cm).
For ultra-thin edge-lit or slim back-lit panels, a minimum plenum clearance of 50 mm (2 inches) above the gypsum ceiling is recommended to accommodate the external driver box and ensure proper heat dissipation.
Spring clips require no pre-assembled perimeter frame, making them ideal for smaller round or square panel downlights. However, for large 2×2 ft or 2×4 ft troffer panels, a complete recessed drywall aluminum frame provides superior structural support and prevents drywall cracking over time.
Suspension kits utilize spring-loaded push-gripper locks. Pressing the top plunger allows the steel cable to slide freely in either direction. Releasing the plunger locks the cable instantly in place under tension.
Selecting the ideal LED panel mounting method requires matching fixture architecture with job-site ceiling constraints. Whether your project demands ultra-thin lay-in panels for office grids, customizable surface-mount frames for concrete structures, or low-glare recessed troffers for executive spaces, working with an experienced manufacturer ensures seamless job-site execution.
For B2B distributors, MEP contractors, and project specifiers, KEOU Lighting provides a comprehensive commercial LED panel light range engineered with versatile mounting accessories, eye-protection diffusers, and flexible OEM/ODM manufacturing capabilities. Contact their technical engineering team today to review mounting specifications or request customized project quotations.


